It’s been a month since my last olive post, and I have results: My latest round of olives is cured and ready to eat (well, part of it). I started with about 2 kilos of black olives. Of those, half were cured in salt, another half were pickled in brine with Mediterranean herbs, and the remainder (really, all this somehow adds up) were prepared in miso paste, like the pickles we saw at markets in Japan.
A little bit of background: Around a month ago, I described how to make cured olives in brine here. As we left off, I had just received a new crop of olives — black ones this time — and divided them into batches to cure in different ways. Now, the results are in.
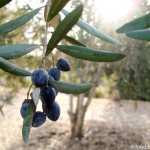
I should note that I still don’t know what kind of olives I’m working with here (black Syrians Souris?). If anyone recognizes them from the photo, please let me know.
 SALT-CURED OLIVES
The first batch was cured in salt. This is probably the easiest way of doing so, and it creates quite pleasant results — what people who shop at markets here know as “Moroccan olives” or “Turkish olives.” My issue with these olives was that they were always too salty, and I was thus a little apprehensive about burying my olives in kosher salt for a month. It turned out I didn’t need to worry.
Salt-cured olives are made by, quite simply, thoroughly coating the olives in kosher salt in a porous material. I used a fabric bag, the kind I usually use for making light cheeses. I’d been warned that moisture would slowly seep out of the bag, so I put it on a plate. I turned the bag every few days, as the bottom side became moist (it never became truly soaking wet). Not surprisingly, after a month of this, the bag was encrusted with a stiff layer of salt.
 As with olives in general, you test to see when they’re done by tasting them. I tasted my olives about once a week, and after four weeks they were no longer bitter. I poured out the contents of the bag, sifted out all the salt, and
 rinsed off the olives(don’t do this, it makes them spoil). At that point, the final step was merely tossing them with some olive oil. Ta-da!
These olives came out black, wrinkled and pleasantly sweet, and I found that some of the smaller specimens were even a little dry for my taste — they could have done with less curing time. In any case, the olives were not overly salty.
 OLIVES WITH MEDITERRANEAN SPICES
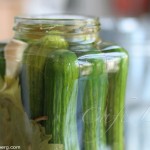
The second batch was pickled in brine. I soaked them in water for two weeks first, replacing the water every few days. I’m not sure how necessary this was; I think a week would have been enough.
The brine (for 1/2 kilo of olives) contained several halved garlic cloves, a good tablespoon or so of dried basil, a teaspoon of dried rosemary, a teaspoon of dried marjoram, a teaspoon or two of peppercorns, and brine (one tablespoon salt per one cup water). I didn’t add lemon, which turned out to be a mistake — apparently some acidity is needed to help along the pickling process, so after a few weeks, my olives were still quite bitter (this could also be because I didn’t crack them, a step that speeds up the pickling process). At this stage I added another teaspoon of salt and about a tablespoon of white wine vinegar (we’re going Mediterranean). However, despite the bitterness, the olives were acquiring a pleasant flavor from the herbs and spices, particularly the basil, and were fading into a light purple.
 OLIVES IN MISO PASTE
I tried curing the last batch of olives by packing them into a plastic container, embedded in miso paste. Miso paste is a salty, fermented Japanese paste, made from soybeans or another legume or grain. I’m not exactly the first person to make miso pickles — in fact, I found an entire book on Google dedicated to miso, with a whole chapter on miso pickles. (This is a great resource if you ever wanted, say, to use miso in a dessert.) And, you might note in the photo, the miso pickles we saw at a market in Kyoto.
 Anyway, miso pickles generally need to sit for a relatively long time to cure. As of now, a month later, my olives are somewhere between black and purple, and are beginning to acquire a light miso flavor, but are still quite bitter (and not at all salty). However, the good news was that I wasn’t certain this flavor combination would work (olives and miso?!?), but it seems to be showing promise. I’ll update when they’re done. (In the photo: My olives right after they entered the miso.)
Apparently when making miso pickles, after the food of choice finishes pickling, you just pull said food out of the miso paste, and either use it again for another batch of pickles, or cook with it, its flavor enhanced by the juices your fresh pickles left behind. We’ll see if the olive liquids enhance my miso paste enough to cook with it.