Dulce de leche cheesecake

June 4, 2009 at 1:00 pm | Tags: , , ,

dulce-de-leche-cheesecake3

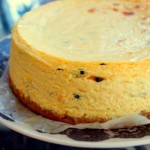
My friend Leonie gave me a jar of organic goat’s milk dulce de leche from Sde Bar. It so happened that I had another identical jar that had been sitting in my fridge for the past year, so I knew I had to use it quickly — I like dulce de leche, but we don’t eat it on its own. So, I decided to turn it into a cheesecake.

On another unrelated note, this is my 100th post … how exciting.

This dulce de leche has quite a strong flavor of goat’s cheese, so I mixed it with regular, cow’s milk cream cheese (3% fat) in order to dilute it a bit. The end result still has a hint of that goat’s milk flavor, but is not overpowering.

The omission of sugar is not an oversight. Dulce de leche is quite sweet, and I think it made the cake sweet enough by itself. However, as in everything, taste as you go — if your dulce de leche isn’t as sweet as mine, you might decide to add some sugar.

To make two 10-centimeter diameter cakes, or one 16-centimeter cake:

goats-milk-dulce-de-lecheFor the cheesecake filling:
350 grams cream cheese (I used 3% fat)
250 grams goat’s milk dulce de leche (or regular dulce de leche)
2 eggs

For the crumb crust:
75 grams plain cookies
25 grams butter
(These crust quantities make 10-centimeter cakes. For one large cake, you might want to increase the quantities to 120 grams cookies and 40 grams butter, for a thicker crust)

Preheat your oven to 160 degrees Celsius.

Prepare your baking rings or spring-form pans: Cover the base of the spring-form pan with a sheet of baking paper, and close the pan around the paper and the base. For baking rings, place each ring on a square of baking paper slightly larger than the base, and wrap the baking paper and ring in a sheet of tinfoil, enough so that the tinfoil slightly folds over the upper edges of the ring. Place the baking ring on a hard surface that can be used in the oven, such as a cookie tray, to support the bottom of the cake.

Prepare the crust: Blend the cookies and butter in a food processor. Dump into the pan(s), and pack into an even layer with a spoon.

Prepare the filling: Beat together the dulce de leche, cream cheese and eggs. Pour into the pan(s).

Bake the cakes: Bake 10-inch cakes for 40 minutes, 16-inch cake for 50 minutes. Cover with tinfoil after the first 10 minutes to keep the top from browning.

After baking time is done, let cool for 30 minutes to an hour in the oven, with the door cracked open. Once cakes are cool enough to handle, remove from the oven and let cool completely to room temperature. (The slow cooling process keeps the cheesecakes from cracking on top.)

Once the cakes are cool, remove the rings or the sides of the spring-form pan. Remove the baking rings: First unstick the base of the cake from the bottom of the ring — put your fingers under the base of the cake, and moving around the very edge of the ring, gently press the crust upwards, just enough to free it. Then, place the cake on a flat surface and carefully lift the ring.

NOTE: Double the quantities to make a 24-centimeter cake.


Bookmark and Share

9 Comments »

Have something to say? Tried a recipe and liked it, or want to suggest a variation? You're invited to post it here. RSS feed for comments on this post. TrackBack URI

  1. This looks and sounds yummy. If only I had access to a jar of dulce de leche.

    Comment by Lorraine — June 5, 2009 #

  2. I have been going thru your blog for sometime now, but first time leaving a footprint. Just wanted to let u know that it is an awesome place. your recipes rock, pictures are gorgeous. I have subscribed & will be back:-)

    Comment by Soma — June 5, 2009 #

  3. Awesome, glad to hear it :-)

    And what a funny coincidence, I’ve been reading your blog as well …

    Comment by Liz — June 7, 2009 #

  4. [...] You can find my dulce de leche cheesecake recipe here. [...]

    Pingback by Cafe Liz » Passion-fruit citrus cheesecake -- Kosher vegetarian recipes from my kitchen in Tel Aviv — June 7, 2009 #

  5. You had me at “made from three simple ingredients!” I have a Mexican cookbook (Rick Bayless) which uses goat’s milk dulce de leche, and if I’m not mistaken, you can make it yourself by slowly reducing goat’s milk and maybe sugar? This might come in handy if I can’t find any dulce de leche readily available for this recipe.

    I found you on TasteSpotting and am writing to say that if you have any photos that aren’t accepted there, I’d love to publish them. Visit my new site (below), it’s a lot of fun! I hope you will consider it.

    Best,
    Casey
    Editor
    http://www.tastestopping.wordpress.com

    Comment by TasteStopping — June 20, 2009 #

  6. Looks amazing!

    Comment by DelightfullySweet — June 20, 2009 #

  7. Hi Casey, thanks for checking out my blog.

    The cheesecake really is that simple, and it kind of amazed me when I thought about it! Apparently you need to start with condensed milk to make dulce de leche, I guess you could somehow condense your own goat’s milk. I just found this recipe by David Lebovitz for making dulce de leche in the oven.

    Anyway, I’m lucky enough to have goat’s milk dulce de leche readily available.

    Update: Here’s a recipe to make dulce de leche from milk, from scratch.

    Comment by Liz — June 21, 2009 #

  8. I love cheesecake with dulce con leche! and I prefer the goat milk version, homemade :)
    Your cheesecake looks so cute, I want to do one, again! :P

    Comment by Sha — July 4, 2009 #

  9. Thanks Sha! The goat’s milk definitely added a special flavor.

    Comment by Liz — July 7, 2009 #

Leave a comment

After you submit a comment, it should appear above, even if it's been held for moderation. If it doesn't appear, that means it's been pegged as spam. Please contact me directly to let me know.

In order not to get falsely pegged as spam, if you're a first-time commenter, please don't post anything that looks like a form letter, or include links (you can write out the name of the web site, or send links to me in a message, and I'll add them to your comment).

XHTML tags that can be used: <a href="" title=""> <abbr title=""> <acronym title=""> <b> <blockquote cite=""> <cite> <code> <del datetime=""> <em> <i> <q cite=""> <strike> <strong>

All content and photos copyright 2008-2010, Liz Steinberg. All rights reserved. Please seek permission before republishing.
Powered by WordPress with theme based on Pool design by Borja Fernandez.
Entries and comments feeds. Valid XHTML and CSS. ^Top^